
CBX Jimmy Volkswagen 2015 Golf 7 1.4 TSi
 |
| Comfortline Golf 7 2015 |
 |
| Basic Family Car 1.4 |
On 13th June 2016, I have received my used March 2015 Volkswagen Golf 7 1.4 TSi . This replaces my 2009 Golf 5 GTI. This car was owned by John Ioannis Anagnostopoulos from Greece. Got the car relatively fast as they are in the midst of migrating to UK after 9 years in Singapore.
The car was used primarily by his wife Afroditi to ferry the kids to school and running around Bedok area. The mileage was 16,000 km when I took over the car. Spent several days cleaning up the car to CBX requirements.
Have many plans on my epic journey to learn about the MQB platform car. As such, have purchase this relatively basic car. I don't want the Keyless Push Start but would not mind the KESSY Keyless Entry. The sunroof on the Sports version is also not a required option.
The epic journey begins....
1. Decorative Exhaust Pipe Inserts ( 15 June 2016 )
One of the first things that attracted my attention is the exhaust pipe inserts provided by Volkswagen Singapore. It is a total misfit using an offset oversize pipe over a smaller pipe. It is impossible to align the two pipe to achieve a nice fitting look. Don't understand why Volkswagen would release such a product. It degrades the look of the car. Better to have the original exhaust pipe itself without any chrome inserts. |
| The Ugly Originals |
 |
| Just plain poor engineering |
 |
| My new slip ons |
 |
| Nice fit : Almost impossible to remove |
2. Interior Roof Lighting ( 17 June 2016 )
This vehicle cam with the standard incandescent light bulb which is blue tinted. Suppose to give a "white" appearance but it is much too amber. I upgrade the bulbs to a 5000K SMD LEDs meant for the headlight pilot light. |
| View of cabin with the 5000K SMD LED bulb ( 2 pcs ) Picture taken in a basement carpark |
 |
| Brightened the rear cabin with the same bulbs ! |
This is the first time I am using this bulb for the cabin as the Golf 7 cabin light assembly have a much bigger cavity than previous model. The bulb fitted perfectly. The bulb would not fit on previous VW models.
3. Door Exit Warning Lights ( 19 June 2016 )
As a standard safety feature, the door exit warning light is a must as far as I am concerned. Apart from light up the door area in dark areas, it also provides some visual warning of approaching vehicles.Unfortunately, none of the Golf 7 vehicles are equipped with the door exit warning lights. Even on the top end Golf R models.
Factory wiring diagrams do not provide any wiring instructions on the required system. We managed to figure out how we can install the lights on the Golf 7. Modification on existing system is require plus coding using VCDS.
 |
| Front Door Door Exit Warning Light |
 |
| Rear Door Door Warning Lights |
4. Leather Key Pouch : 21 June 2016
The original key is so plain Jane. No chrome tips like those from the GTI. Got to get a cover up for them. These leather key covers does the pretty good ! |
| Nice genuine key pouch for the VW flip keys |
5. Boot Loading Protective Trim Sill : 22 June 2016
Always protect the boot loading trims with these robust stainless steel protector. A must for every car.


6. Door Sill Protector Scuff Plates for Golf 7 : 2nd July 2016
The standard door plate provided by Volkswagen is pathetic. I would classify it as a nameplate rather than a door sill plate or scuff plate. There is absolutely no function except to remain people that it is a Golf model. No protection whatsoever of the sills or edges. Mine got scratches already following one year of ownership by the previous owner.Got them removed and was surprised that it is actually an original Volkswagen part under no. 5G0.071.303B
 |
| A nameplate ? |
 |
| Available as plain lines or model associated. I chose the TSi version. |
 |
| The rear is much shorter than the front but looks as good. |
7. Footwell Lighting : 3rd July 2016
The Golf 7 Comfort Line did not come with the footwell lights. We retrofitted them with the Golf 6 normal incandescent footwell lights and replace the bulbs with LED bulbs.
An aftermarket harness needs to be introduced on the vehicle and connected to the BCM to control the lighting.
Coding of the BCM is required and is more complicated then it was on the earlier models. With help sought from the earlier pioneers of the Golf 7 since 2013, we managed to get them fitted relatively easily.
Adjustment of the footwell light in ambient mode was done via the MFD on the instrument cluster previously. Now, it is done via the Information Center on the Radio. I am amazed by this....though I am a late come as they have this since 2013. Something new for me. MQB platform is interesting !
 |
| Both the front and rear footwell area are lighted up 100% with doors opened |
 |
| Ambient mode....lighted up at 30% per my choice |
 |
| The apertures are provided for on all the cars. |
 |
| After coding, the Footwell option appeared |
 |
| My choice at 30% during headlights switched on |
8. Retrofitting the External Charcoal/Pollen Filter on Golf VII 7 : 5th July 2016
The open port net on the external air intake vent is subjective. Dirt and grim plus insects would get through the gaps. |
| The original screen housing on the Golf VII 7 |
 |
| Dirt and road grim get pass the screen and end up inside the cabin and get stuck at the pollen filter inside |
 |
| It is fortunate that there is a pollen filter built before the evaporator |
 |
| The replacement filter housing with the carbon impregnated |
 |
| The air quality sensor is fitted as per original position |
 |
| The rain water deflector is refitted into position to complete the job |
Adding to the work, I replaced the old carbon impregnated filter with the latest Volkswagen anti-allergies carbon filter. This part have only been recently introduced. Cost slight more than the normal carbon filter.
 |
| New Anti-Allergies Carbon Filter vs Normal Carbon Filter |
 |
| The Choice is obvious |
Now, the air smell so much fresher and cleaner with the new set up. Well worth the money spent to make the occupants healthier and alert !
9. 29 July 2016 : LED Tail Lights from Golf R ; Smoke Tint !
Cannot resist the call of the R and had the ends replaced with the smoke tinted R lights. Looks superb with them and coded them to light up all 4 lights together ( inside and outside ) instead of outside only.The smoke tint looks really matching on the Night Blue Metallic colour.


Dynamic Signal Lights
10. LED Bulbs H11 Fog Light ( 30 July 2016 )
Replaced the rather dull incandescent H11 bulb on the Golf 7 fog lights ! These bulbs have special LEDs from Phillips. The light intensity is 4000 illuminance.
Did not consider the HID ( High Intensity Discharge ) bulbs as they are rather glaring as previously experienced. I was concerned that these LED bulbs would be the same but was surprised that the way the bulbs are mounted to reflect properly onto the road rather then all over the place. As such the bulbs are not glaring at all !
After install, I actually have the fogs working as cornering lights. Never show the fog working as cornering lights as the original incandescent bulbs shown poorly on the road. Now, the LED literally brightens up the right and left corners during turns.
The original DRL on the headlights is a mismatch to the White fog lights currently. Next upgrade would resolve this issue.

The Fog lights appear blue on the picture but is actually white to our eyes !

Light thrown onto the floor
( little or no reflection from the stainless steel railing in front )

With only the fog lights switched on, the entire front floor area is literally flooded with white light ! The corners are so clear now !

The beam of the fog light are flat and down without adjustment.
This would not glare other drivers unlike HID bulbs


( little or no reflection from the stainless steel railing in front )

 |
| The beam of the fog light are flat and down without adjustment. This would not glare other drivers unlike HID bulbs |
11. 31 July 2016 : DSG Shifter from Audi RS Converted to Golf 7
I never like the original shifter from VW since the Golf 6. The joystick design is just not there. The E35 golf ball design was nice on the Golf 6 GTI but it stopped there.
Comparing the original imitation leather and plastic feel shifter, the RS shifter is really NICE ! The feel is just out of this world. Something that we always come into "contact" when we drive !
I converted the Audi RS Shifter onto the Golf 7 ! Love the "On The Ball" feel !
Comparing the original imitation leather and plastic feel shifter, the RS shifter is really NICE ! The feel is just out of this world. Something that we always come into "contact" when we drive !
I converted the Audi RS Shifter onto the Golf 7 ! Love the "On The Ball" feel !
 |
| Too plasticky and cheap feeling. |
 |
| The Million $$ feel of the RS shifter |
 |
| Feels Great to the feel !! |
 | |||||||||||||||||||||||||||||||||||||||||||||||||||||||||||||||||||||||||||||||||||||||||||||||||||||||||||||||||||||||||||||||||||||||||||||||||||||||||||||||||||||||||||||||||||||||||||||||||||||||||||||||||||||||||||||||||
Classy justification for a great car !
12. Retrofitting Lane Assist on Golf 7 (6 Aug 2016 )
The benefit of the lane assist in my opinion, is very necessary. It assist in keeping the car in lane when travelling above 70 kph by gently correcting the vehicle direction by electrically turning the steering wheel to aid the driver.
Fitting the original VW Lane Assist on the Golf 7 involves major modification which includes the windscreen, rear view mirror and even the Gateway of the vehicle. This is not for the faint hearted !
A special part number for the Lane Assist option windscreen was ordered and installed on the Golf 7
Calibrating the Lane Assist Camera A5 R242
The Lane Assist Camera requires calibration to the car installed. We use a laser X-Y tool to precisely position the calibration board VAS6430
Traffic Sign Assist
As part of the Lane Assist function, the front camera double up as a Traffic Sign Recognition camera. It reads specific road signs and display on the instrument cluster to warn the driver.
13 : August 12 2016 : Fitting the Anti Theft Alarm Warning System ATWS on the Golf 7The Golf 7 is prepared for the ATWS. All the base version as I know are fitted with only the Anti Theft System minus the Warning system. Presumably this is due to cost concern.
ATWS Door Lock/Unlock Acoustic Confirmation
with Coming/Leaving Home Light via Fog Light LED
The standard Anti Theft System comprises of the dead bolt door locks on all the doors/hatch and locking indicator on all doors/hood/hatch. Once the doors are locked, it cannot be opened from the inside. The Anti Theft Warning System can be incorporated onto the existing factory system by adding the various tilt & intrusion module/siren/switch/harness and programming. This would protect the vehicle from any intrusion or being towed away illegally. There is not additional controller device needed as the system work with the original Volkswagen door remote controller key. Door opening and closing can be audible as desired. This is controlled from the Information Center (Radio Head Unit) Additional Feature : The doors can also be programmed to be automatically armed when all the doors are closed. This would render vehicle protection in the event the driver forgets to lock the vehicle when leaving it. If the doors are opened again, the siren would sound off unless the ignition key is inserted into the ignition lock cylinder.
14 : 19 August 2016 : Retrofitting Discovery Pro MIB2 on Golf 7
Having been looking forward to this project for my Golf 7. Retrofitting the latest MIB2 Discovery Pro unit is not a easy task.
It involves replacing the entire glove box console so that the controller unit ( 5F Information Center ) is installed.
A specially fabricated harness extend the connector from the original position to the glove box location.
After fitting the two main units, the system works okay. There are some functions and gremlins that needs to be ironed out.
15. Shark Fin Retrofitted (August 22 2016)After the Discovery Pro retrofitting, an original roof mounted GSP antenna is absolutely necessary for good GSP reception. We fitted the original new Volkswagen shark fin which is used on all the MQB chassis vehicles such as the Golf 7, Passat, Touran and Tiguan.
We have done many retrofit before using the older shark fin antenna which was a simple 15 mm x 15 mm square hole. However, on the new Golf 7, a really big odd shape hole needs to be cut onto the roof. This is not for those with weak stomach.
The hole is cut using a template of the antenna. The odd hole is really odd. It is not evenly shaped and not centrally aligned. Had to compare the actual antenna to the marked hole before proceeding with the actual cutting.
The roof lining must be lowered partially to allow access to the underside where the antenna must be secured. That also process requires removing most of the trims at the hatch which is hindering the roof lining lowering.
I approached the job with an opened mind that if everything fails, I would patch up the hole, weld it up and respray the whole roof at most !
However, work proceeded successfully and the odd shaped hole was cut nicely. I am about 95% satisfied. Could have done a better job. Nevertheless, the antenna fitted nicely, secured properly and when tightened from the underside the antenna lock in 100% !
This is a new designed antenna anchor. The Audi A5 antenna looks similar but is secured with a simple nut. The fit was not as solid though. The single nut holding the antenna down on a slightly curved roof may be the cause. This new anchoring method is really solidly mounted.
Cannot be happier with the GPS reception. Even when parked at the 2nd floor car park with out 10% viewing of the sky, the reception was 3/12 satellite.
16. Automatic Pop My Hatch Kit 17 Sep 2016
The standard opening of the hatch via the remote on the key fob is horrendous. All you get is a "click" and a very very slight movement on the hatch indicating that it is "opened". You will need to lift it with your hands to get it to open up.
We fitted the automatic "pop my hatch" kit to the Golf 7 and it did wonders !
Now all I have to do is to stand back, press the remote and the hatch pops right open wide ! Very wide in fact. Seems much wider than on the Golf 6, a friend from Malaysia have commented !
Guess he is right ! 7 is higher than 6 !
17. Adaptive Cruise Control ACC on Golf VII 7 : 22nd Sept 2016
The ACC is a very useful feature on the VW car and my experience on the Passat have spurred me to acquire this feature on the Golf 7.
A "Must Have" in my opinion.
My quest for this comes with a price. It is not as simple to install as it was on the Passat B6/7.
Volkswagen have made it very much more difficult for folks like myself to do retrofitting by adding the Component Protection feature on the ACC controller. It can only be activated online via VASPC or ODIS. Best of all, it cannot be activated unless you have this feature on your original car......meaning to say it is impossible to retrofit because mine did not come original from factory to allow me to enable it. However, my European gurus have a way around it. They are are genius working there.
To install the radar, it is not as simple as hiding it behind the emblem now. We have to replace the whole bumper guard behind the front bumper moulding with an original part number which comes with a proper retainer to hold the radar.
18. Dynamic Turn Signal for Retrofitted LED Tail Lights
Using a special module where the signal lamps inside and outside are electronically triggered to give a sequential arrangement we achieve the dynamic turn signal effect. Not actually the REAL dynamic effect where the individual bulbs are lights up respectively one after the other to give you the running light effect. This is done on the Jaguars and Audi etc. Nevertheless, it is good enough for the price paid.
19. Golf R Double U DRL Xenon Headlights 5 Nov 2016
Finally done ! After several weeks with a stubborn error which cannot eradicated due to a wrong wiring. It was a back breaking effort.
Volkswagen have several different Xenon Headlights which are differentiated by the stripe inside the headlamp. The common Xenon single U found on all the 1.4 Sports version are with a bright chrome stripe, the more exotic GTI is naturally with a red stripe, the Golf R is with a mat stripe and the Golf-E which is a LED headlight is with a blue stripe. There even a yellow stripe design for the Golf R 400
Initially, I wanted to fit the E-Golf headlights because of the bright LED headlight function but dropped the idea because of the absence of the double U-DRL feature.
Imported the RHD Golf R headlights directly from Germany.....fresh from the oven.
It is not possible to fit the AFS headlights on the vehicle without replacing the BCM which controls the AFS/2xU-DRL function. The original BCM does not support this function. Replacing the BCM was a nightmare. Not easy but not impossible. An adapter harness is required to connect up the new AFS headlights to the new BCM.
20. High Polish Stainless Trim Enhancement : Golf 7 : 17 January 2017
The original black rubber window frame on the Golf 7 is dull. The Passat B7 windows are endowed with the stainless trim from factory.
Found these stick on stainless trims which are perfect for the Golf 7 windows. They are Made In China products which came highly recommended from a friend. The fit and finish is very good. Well....who said that China products are always bad ?
The sticker tape provided is from 3M ( maybe real maybe next door neighbor 3N ) . After several days, they seem to be holding. Very firmly attached.
Now the Golf looks more executive ! Done away with the black black look. The chrome finish is pleasing to my eyes    21. Steering Knuckle Upgrades : Golf 7 1.4 TSi : March 2017
To enhance handling and performance, a reduction of unsprung weight would be a plus. So, we replace the heavy Cast Iron knuckle to the GTI/R styled aluminum alloy steering knuckle. The weight difference is tremendous !
This involves replace bigger drive shaft bearing and ball joints as well the respective nuts. It is an expensive exercise. Total cost is about S$1500.
22. Active Info Display Instrument Cluster on Golf 7 : 25 April 2017
Have always been fascinated by the Active Information Display on the Passat B8 when it was first introduced in 2016.

I got to get one of this but cannot afford to buy the new Passat Exclusive B8 2.0 !
When the new Golf 7.5 was shown, it have the Active Info Display cluster ! This is absolutely good news ! I got my hands on a set from VW Germany including the original trim cover which is a must.
23. DCC on Golf 7 MQB ( Dynamic Chassis Control ) - March 2017
Yes, I am an addict to the DCC on Volkswagen cars.
Embarked on this unknown journey on the new MQB chassis Golf 7. Unknown because VW have controlled many features with component protection, online coding/activation and VSM(vehicle software management) for what I am aware of. Ordered all the parts from Germany including harness for the wheel arches. Custom made harness is required to connect the system to the vehicle.
Control of the DCC mode is no longer via a simple push button on the central console but via the Drive Mode selection on the Head Unit. In my Golf 7, we have the Discovery Pro unit and upgraded with the Golf R drive mode features.
The Individual mode allows driver to change the various settings whereas the rest are fixed.  The previous display of the Comfort/Normal/Sport function on the cluster also follows the HU change. At the end of the project, the effort and cost is overwhelming. The ride and handling is as usual, tremendous and satisfying. This upgrade is not for the normal Golf 7 owner to consider. 24. Map Projection onto AID Cluster Golf VII (1st Sept 2017)
The journey never ends....always something to play with the lovely Golf VII 1.4 TSi. My epic journey is described here.
Having completed the Discovery Pro retrofit on the Golf 7, went on to retrofit the AID Cluster early this year.
The AID Cluster is the best retrofit that I have done so far and it is not only functional but an eye-candy for me each time I am in the Golf ! Really really enjoy this AID Cluster.
Problem is the Navigation display on the AID. Was not able to activate this feature even though I have all the necessary hardware and fibre optic cables installed. Problem is the Discovery Pro firmware and EPROM is too old to support this. We needed an update/upgrade to get it done.
For almost a month, the control module of the Discovery Pro have been sent back to Germany and driving the car is totally silent. No entertainment at all apart from talking to the wife.
Finally, the control module came back. With several coding and adaptation, we got the map projected onto the AID. This was done with some help from Germany online.
Updating the control module requires a new EPROM to be inserted that will support the feature. They also flash it with the latest firmware. Now my display is in Blue, my favourite colour !
Now...driving the Golf VII is even more enjoyable as we can now see the navigation map and SD media title icon on the AID. Radio icon seems to be an issue though even though it is displayed on the display screen.
One word ! SHIOK !
|


 |
| Drastic Drop ! Front Springs |
 |
| Rear Springs....also substantial |
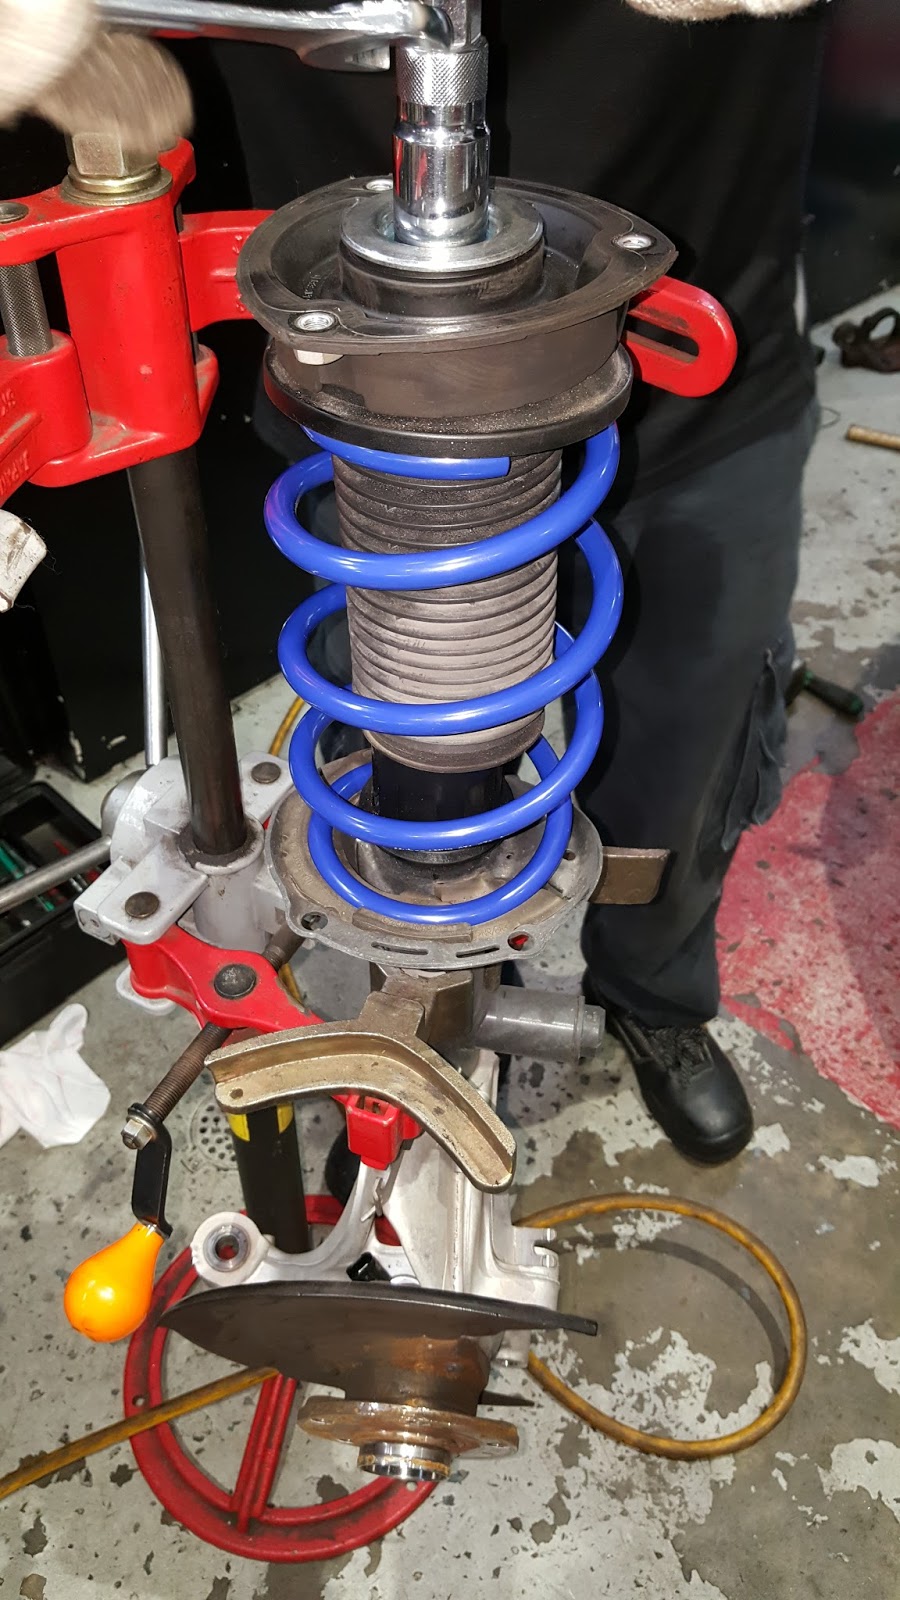 |
| Springs are so short, they did not have to compress them to fit the fronts |
 |
| Rear Springs fitted |
 |
| Front springs fitted |
|
| Original when first received the Golf 7 in 2016 |
 |
| Golf 7 Retro in Oct 2017 |
|
| Rear View : 17" Singapore alloy |
 |
| Rear View in Oct 2017 : 19" Santiago Alloys |
 |
| My Babe Golf |
Conclusion : The ride have definitely improved. Firmer but yet not uncomfortably firm. Coupled with the Dynamic Chassis Control in Comfort mode, the ride is just nice for a Golf 7.
Update Dec 2017 : Springs have since been removed and original placed back as the Boss did not like the lowered stance.
27. Driver Assist : Lane Departure with OPS Self Parking and Rear Traffic Assist - 14 Feb 2018 ( back-dated update )
Retrofitted the new V4.0 Park Pilot/Park Assist on the Golf 7. A necessary tool for the spoiled driver like myself.
There is a new Rear Traffic Assist function which works with the Lane Departure Assist. As described by Volkswagen here :
The Rear Traffic Alert assists the driver, within the system’s limits, when reversing out of a parking space. Sensors in the rear bumper enable the system to monitor the lateral area behind the vehicle much earlier than the driver. If another vehicle is getting too close, an audible warning alerts the driver to the critical situation. If the driver fails to respond, the system can mitigate the potential consequences of an accident or prevent the accident in the best-case scenario by means of brake intervention where a collision is imminent.
The Rear Traffic Alert is available in combination with Blind Spot sensor or Side Assist.
Retrofitting the Lane Departure requires removal of the rear bumper to fit the sensors. The entire wing mirrors also need to be dismantled and broken down to run the connecting cable to the new mirror glass LED indicator.
 |
| Installed the rear radar unit for the Lane Departure System |
 |
| The mirror assy dismantled completely to run the additional wire set for the Lane Departure Warning LED on the mirror |
 |
| During initial engine start up, the warning light would light up as a checking procedure for the Lane Departure System |
 |
| Additional control options on the HU |
 |
| Normal front OPS manual activation |
 |
| The Rear Traffic Sensors reacting |
 |
| The 360 deg sensor is a bonus plus to the rear camera. |
Improvement have been made to the new Park Pilot Park Assist system V3.0 on the Golf 7. Unlike the V2.0 system found originally on my Passat B7, the newer system automatically triggers the display when in slow traffic situation or when in the car park around corners close to objects. This option can be controlled via the Discovery Pro screen.
The front passenger presence detector is also missing. The detector would warn the driver to have the passenger put on the seat belt. On the LHD version, the front passenger detector is on the right seat which is what the driver is sitting on. The presence detector is a big contact mat placed "inside" the seat cushion. So, it is not possible to remove the presence detector mat from the right side seat and put it onto the left side seat since it is not removeable. So the only option is to swap the entire seat cushion from left to right. I decided that it is just too much work just for the presence detection to remind the front passenger to put on the seat belt. I deleted the option for the seat belt reminder for the passenger seat.
The rear seat came with side airbags. A feature not even found on our latest GTI/R Golf 7.5 . The cost would go up when this option is added and thus not viable as a selling feature. However, as mentioned all the safety apparatus have been deleted in Germany. The side bolster which contain the airbag had it's side airbag deleted. Only the bolster can be used to add comfort to the rear seating position. Instead of the regular plastic trim which is obviously very hard, the soft cushioned side panel/bolster is a welcomed edition.....said my rear seat passengers !
28. Upgrading Golf 7.3 Comfort Seats to GTE Sports Seat : July 2018
I have never like the Golf 7 Comfort Seats ! They look and feel is just not what I like. Compare to my 2009 GTI Mk5, the seats are just too plain. The local leather is also far from what factory provide like on the Passat B8.
I wanted to upgrade to the sport seats from the GTI but the red threading and pattern would make the car interior look funny. My next choice is to go for the GTD which is beige and would blend nicely into my interior. In Europe the trend of people to buy the GTI/GTD is choosing the base trim which is the famous VW Tartan design. Very difficult to find leather or higher material used sport seat in good condition and RHD.
I decided to go for the GTE blue tartan design. Found a seller in Europe selling parts from scrapped test vehicles. They are not in used scrapped car business but deals in exporting/scrapping of test vehicles from Volkswagen. Ordered from their web site in good faith and crossed fingers. After about two weeks, the seats arrived. Collected them from the forwarder in Changi Air Cargo Terminal.
 |
| How to fit this into my little Golf ? |
I went with my car stripped of the rear seats and passenger seat as it is impossible to fit all the GTE seats into my little Golf 7.3 . I stripped the pallet at the terminal and fitted the other seats and carried the driver's seat back.
 |
| Packaging was professionally done by the supplier ! |
 |
| Packed nicely and tightly....little chance of damages. |
 |
| They even shipped the LHD central console which I have to throw away as it would not fit . Only retrieve the arm rest and some parts. |
As it is German law that all safety equipment cannot be sold as used, the seats came without seat belts or airbags. Believe me, it is a real PAIN swapping the seat airbags from my original seats to the GTE seats. Totally PITA ! Nevertheless, I got to learn about seat removal and disassembly plus airbag replacement.
 |
| Rear seat...see the seat belt...it is cut ! You cannot use this broken belt. Have to swap over from the original seat. Another PITA operation. |
 |
| Temporary fit...no seat belt buckle ! |
Removed the buckle and airbag from the original seats. Practising on the original seat makes perfect fitting the airbags onto the new GTE seats. Yet, still a lot of back breaking work.
 |
Not for the faint hearted to do this !
|
 |
Sliding in the airbag module needs almost total removal of the seat fabric cover !
|
The front passenger presence detector is also missing. The detector would warn the driver to have the passenger put on the seat belt. On the LHD version, the front passenger detector is on the right seat which is what the driver is sitting on. The presence detector is a big contact mat placed "inside" the seat cushion. So, it is not possible to remove the presence detector mat from the right side seat and put it onto the left side seat since it is not removeable. So the only option is to swap the entire seat cushion from left to right. I decided that it is just too much work just for the presence detection to remind the front passenger to put on the seat belt. I deleted the option for the seat belt reminder for the passenger seat.
The rear seat came with side airbags. A feature not even found on our latest GTI/R Golf 7.5 . The cost would go up when this option is added and thus not viable as a selling feature. However, as mentioned all the safety apparatus have been deleted in Germany. The side bolster which contain the airbag had it's side airbag deleted. Only the bolster can be used to add comfort to the rear seating position. Instead of the regular plastic trim which is obviously very hard, the soft cushioned side panel/bolster is a welcomed edition.....said my rear seat passengers !
 |
The plastic side panel
|
 |
The "cushion" panel replacing the original plastic trim
|
 |
On the left side. Added comfort welcomed by rear passengers
|
 |
Only a "Airbag" for a smarter appearance. It have been deleted.
|
The rear side airbag installation requires a new trim to be fitted. The two trims are side by side.....the newer trim on left.
 |
The side trim replacement required. Left is for airbag !
|
 |
When fitted, the space is for the bolster "side airbag"
|
Also took the opportunity to replace the rear passenger centre seat belt. The original was intentionally cut by the German side as a preventive measure so that safety item cannot be reused. We swap the original belt mechanism from the old seat to the new. The means that double the work to remove and reinstall is required. Removing the rear seat centre belt mechanism is no easy task. Not for the faint heart as lots of dismantling of the entire rear seat back rest is necessary.
 |
The new back rest with the swapped belt installed.
|
 |
The perfectly functioning rear seat belt. What a pity !
|
29. Retrofitting Heater Seats on Volkswagen Golf 7.3 : Sept 2018
Is the heater seat useful in tropical hot Singapore ? I guess it is not in most cases. However for those with back ache or injuries or old tired backbones, the comfort of heat applied to the back whilst driving is a comfortable thing that only some can appreciate.
Ladies during their "days" also love the heater seat soothing comfort for those cranky pain. My lady passengers swear by them.
Many of the Volkswagen Trendline, Comfortline and even some Highline models do not have the heater seats fitted at factory anymore. These were common options on earlier models in the Volkswagen range but due to cost ( keeping OMV low ), VCS have deleted this option for most of the baseline models.
Have received many inquiries about the retrofit of the seat heaters. I had made a study on the possibility of the work. Here are my findings :
1. The heater element is not supplied as a separate part. This mean that you cannot buy the heater coil or element and replace it when it is faulty aka shorted or burned.
2. The heater element is supplied as part of the cushion aka it is built inside the foam for the seat and back rest. This mean that if your original heater is damaged, you need to replace the respective foam padding....i.e. seat foam or back rest foam.
3. The heating function is performed by the Central Electric Module which is a common part in all VW cars. However, there are many variants. If the car is not originally fitted with the seat heating, the CEM supplied would be a low variant which does not have the necessary circuit to support the heating element function.
4. The control of the heater seat is done via the Climatronic Control module. The seat icon can be seen on both side of the controller. A new Climatronic module is needed if retrofit is to be done.
5. Programming of the new Climatronic module is needed to enable the heater function. No additional wiring is required between the modules.
6. Power to the CEM for the heaters is supplied from Fuse # 27 on the glove box fuse box. The fuse is supplied with 12 volt power but no wiring to the CEM. A good gauge wire need to be added from the fuse box to the CEM connector.
In conclusion, it would be a costly exercise to retrofit the heater seat considering the above requirements. No a viable task unless it a die-die requirement for the heater seat to be available.
My 2015 Golf Mk VII did not come with the heater seats much to my disappointment when I first purchased it. Seems that even on the EQP version, the heater have been deleted.
I have replaced my seats with the GTE seats from Germany. They came with heaters. I had also replaced the CEM on my Golf when I upgraded to the Golf R Headlights . So, all I need was the wiring to connect the seats to the CEM and a new Climatronic controller.
 |
| Retrofitting the GTE which have heater as standard |
 |
| Entry or Mid level models have the heater seat omitted |
 |
| CBX retrofitted electric heater seat on Golf 7.3 |
No comments:
Post a Comment